Showing posts with label crochet. Show all posts

Sunday, August 31, 2014

Grannys no Square - Crochet Blanket


So I kinda just helped myself to a big ole blog break over the Summer, a sneaky trip back to Blighty to catch up with the folks and soak up some of the amazing history, style and culture of my homeland was just what I needed, the kids got to meet all of our family members and get a taste of a real British Summer, which surprisingly was actually sunny, for two whole week!.

It wasn't until I came back from England that I pulled myself together and vowed to finish the mountain of half finished, half started, nearly finished projects I have languishing in my crafty space. This blanket was the first contender. A generous donation from my husbands work colleague, thank you Heather! of a ton of white cotton was just what I needed to unify the colours and spruce up the blanket.

Relaxed and fully recharged I'm raring to get started on sharing all my new projects with you lovely people.


So this project I've had in the works for erm (shuffles feet) about 2 years, yup I raced through the Granny squares then hit a design wall. I wasn't even sure if the Purple, Neon Green, Aqua colour scheme was even going to work. In fact, on reading this, I'm still not sure it does work on paper! oh well!
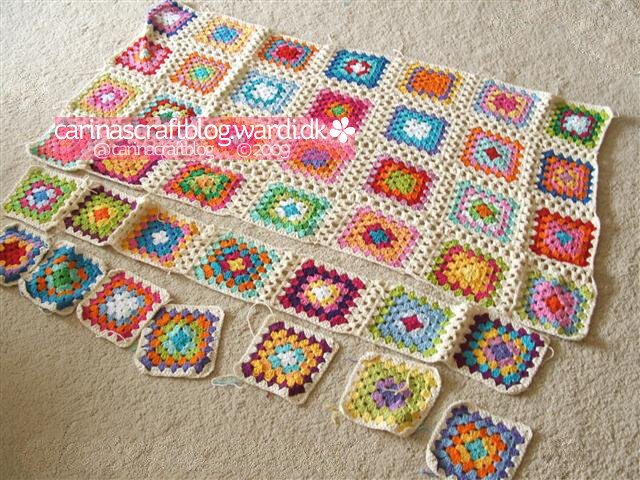


This blanket started the way most of my blankets start, what yarn do I have in the same gauge and fibre content?, I had a bit of Cotton kicking around so I basically threw it all together. I know, I make it sound so haphazard but I really love to be surprised by the outcome.


Crochet tutorial: joining granny squares 1

I used a new joining method thanks to this awesome tutorial from Carinas craft blog which I really enjoyed, it uses the same stitches as the Granny square itself and because of the spacing, a 35 block granny square blanket ended up a generous twin size instead of a lap quilt! (The bed in the pic is a Queen)

Just for fun, here is the funny, sunny little lady, Gabrielle my muse for all things bright, colourful and cute <3


So much more to share, I'm back to blogging and it feels great!

Sunday, September 29, 2013

Crochet: Granny Rectangle Hottie


I have the fondest childhood memories of staying over at my Nanny Grays house. On cold winter nights, in her unheated home she would wrap us up snug as bugs in all manner of blankets, and I would rest my feet on a toasty hot water bottle which she was always gravely concerned would be too hot.

I still love having a Hot water bottle now, and as we rapidly approach the cool nights of Canadian Autumn I couldn't wait to make a cute cover for my 'hottie'.

I'm as much obsessed with Granny Squares as I am hot water bottles, and since I'd been itching to try my hand a Granny rectangle I thought this was the perfect project.
 
 
(Apparently this is the 'boys side' according to the hubs and my little man. Nice to see I could accommodate everyone!)

Perusing Pinterest I came across these gorgeous specimens to get my creative matter working.


Stitch Me Softly - Refashioned knit Hottie cover Tutorial Click through to the Oxfam post for the Tutorial but first check out this blog, it's beautiful, and so inspiring. I need to spend more time searching through all the amazing posts.
 
Not sure why it's not occurred to me how fantastic shrunken Turtle neck knits would be for covers, in a cute kids sweater pattern too? personally I'm loving the Fair Aisle, Scandinavian Star cover.
 
My Hot English self could not resist this one, apparently it's an easy knit? may even try my newbie Knitting skills out on this.


In all its Granny Rectangle glory, it's cute and it's functional, winner!


So what are you crafting to take you into the colder Autumn weather? are you picking up your hooks and needles and stitching up something cosy?

Wednesday, April 17, 2013

Freebie Sample of UK's Simply Crochet Magazine

Simply Crochet cover1

If you've been reading my blog for a little while, you will know that I love love love Mollie Makes, the UK craft/thrift/Creative Inspiration magazine.

I struggle to get copies here in Canada, and by struggle what I actually mean, is that I hate paying $12 for a magazine that costs my fellow Brits a cool fiver.  When I do loosen the purse strings and indulge, I eagerly search out the page with a 'deal' on overseas subscription ($60 instead of $90) to find that the deal ended 2 months before the magazine hit Canada (are you freakin' kidding me?!)

Sooooo (point nearing completion stay with me people) when I heard of a deal on a Mollie Makes affiliated magazine Simply Crochet that was still current, and shock horror actually a price I was willing to pay, I knew I had to share with you guys... then run off and lock that deal down for myself.

Check out the magazines digital Freebie sampler HERE to get a taste of what looks to be another beautifully styled, crafty mag full of projects you know you are going to be itching to get started on.

 
and this is the trial deal I'm excited about: 
 
US/CANADA subscribers purchase a trial of 3 issues for $10
US/CANADA Subscription offer HERE
(Quote ref. 2005)
 
UK Offer is STG 5.00 for 3 Issues, (equally awesome but you lucky ducks can pick up a copy at your local Newsagents!)
UK Subscription offer HERE
(Quote ref. SCRX19)
 
 
NOTE: As with all Trial offers, the company have your Credit Card details, so if you intend on cancelling after your 3rd issue do so as soon as you've received your 3rd copy. Leave it too late, the trial will end and payments of $23.38 will be taken quarterly for an annual subscription of $93.52 (US/CANADA price for 13 issues for the year)


OFFER ENDS MAY 10TH 2013


N.B I'm not in any way shape or form reimbursed for this post, the links for the subscriptions can also be found on the final page of the digital sampler.

Sunday, February 24, 2013

Tutorial - Crochet Edged Notebooks


Ok finally done it, one shaky, very awkward video tutorial to make my Crochet Edged Notebooks.

They make great gifts, look super cute, work up really quickly and who doesn't need a little extra Crochet happiness in their lives.

It's literally just a Single Crochet edging but to help you start off here are a few photos and a video just in case.

What you'll need

Notebook your required size
Crochet Hook (2.55mm or similar size)
Embroidery Floss
Hole Punch/Crop-a-Dile
Yarn Needle
Nail Polish or glue

Take your notebook and make some holes roughly the same distance apart and away from the edge, seriously a rough guess is fine.


Notice the corner holes are closer together, this makes Crocheting around the bed on the cover easier.


Make a Slip Knot
 
 
With your Hook in the front and your thread behind the book cover push your hook through the first hole at the spine of the book, starting at the bottom edge.
 
 
Hook the thread and pull it through the hole


Like this
 
 
Now proceed to Single Crochet, Hook through catch thread, Yarn Over, Pull through


One Sc made, I chose to make 3 Single Crochet in each hole, I made another notebook where I alternated between 2 or 3Sc and that also looked, just play around and see which look you prefer.
 

Continue around until you get to the corner, then either add one more single Crochet to each hole or add a Chain in between the two corner holes.
 
Complete the front and the back separately, i.e. Fasten off after completing the cover and weave the tail ends in but secure with a dab of nail polish to keep from unravelling.
 
That was it, easy huh. I hope this makes sense, photographing yourself Crocheting is hard work, as is deciphering those photos afterwards so bear with me, but nothing was as tough as convincing your husband to tape you Crocheting ;)


Go easy on me folks I suck at video tutes x
 
Want more info or just want to connect with yours truly? follow Ruby Murrays Musings on Facebook, message me at will, see up to date photos of projects not yet blogged about and generally be one of the cool kids ;)

Saturday, February 23, 2013

Mini Crochet Hook Pouch

Quilted Crochet Hook pouch


I was lucky enough to get my hands on a half size set of Crochet hooks, and by lucky I mean I badgered my hubster until he made it so. Luck/Persistent nagging, call it what you will but it worked.

To make sure I didn't lose these mini hooks of course I needed a cute pouch. Cue Michael Miller Folk trees fabric isn't it gorgeous.


Quilted Mini Crochet Hook pouch

The first one went to my bff (yup I'm a growed up big girl still using bff, now can we move on?!) and I had some left over quilted scraps for one for me. WINNER!

I quilted the fabric myself, something very relaxing about simply stitching all those lines. Another quilty project under my belt.


Friday, September 14, 2012

Crochet Edged Moleskin Notebook

 
Did'ya miss me? when I thought no one was looking I snuck out for a much needed holiday with the family, just got back today, knackered, hence clipped sentences, very Military, loving it ;)
 
Anyway check out these cute Crochet edged moleskin (alikes) I rustled up. Just your common or garden Mini comp books again, covered with craft paper, holes punched around edges, then single Crocheted in each hole.
 
Pretty simple but I can break it down further into a Tutorial if I get any special requests ;)
 
 
Lots more stuff to share, anything to avoid the enormous piles of washing and unpacking!
 
p.s I missed you guys
xoxo

Saturday, August 4, 2012

Crochet Necklace Link to Free Pattern


Check out this gorgeous Crochet necklace, looks simple enough and it's Free too thanks to Mollie Makes site The Making Spot.

Look round the site for Free and cheap patterns for Knitting, Sewing, Cross Stitch, and Scrapbooking/Card Making info too. You do need to register first, select the Free pattern for Crochet necklace then 'checkout' as if you're paying, no payment info required though.

I can see these winging their way to family and friends for postage friendly Xmas gifts to UK fam, how lovely would these be in a variegated Embroidery floss? Yum


I've been quiet on the blogging front recently as I'm tackling a couple of big projects I've wanted to start for months, but let's just say I'm loving me some Cross Stitch right now.

How cute is this Vintage Typewriter Desk Set? STG 2.49 is a great price for 4 charts plus info on how to sew the complete desk set with Noticeboard.  Maybe I've just found my next big project...

Tuesday, June 19, 2012

Crafting with Medal Ribbons - Crochet Hook Clutch


So I'm wrapping up this series of Crafting with Medal Ribbons, mainly because my enormous stash of 11m's of these beauties (some 30+ medals) is almost entirely gone (Booooooo). Such a shame because I'm still brimming with ideas and my beloved reuse centre here was fresh out of any medal Ribbons. If you have a stash of these you fancy donating then drop me a line my lovelies.

I absolutely love this tutorial for a Crochet Clutch, such a cute idea and so neat and tidy. Tons of free Crochet Hook roll patterns (sewn and Crocheted) HERE 


craftleftovers.com
From Craftleftovers.com via Tipnut


Button isn't yet sewn on yet but the hubster is home so I had to jump on the pc quick between football games ;)

Thanks for the encouragement also on entering my Medal Ribbon Art into the Competition, I hear back July 1st so I'm super excited to find out who wins this Recycling Contest and the prize of a $1500 gift card for the local Art store could be kinda fun too.

More good news, my Woven Map Notebook cover (17,000 hits and counting, crazy huh?!) has been included on here, I love these run downs of great tutorials, perfect for shaking off that crafting slump.

101_Handmade_Summer_Tutorials_400px


 Any suggestions on what to craft with next? those pesky medal ribbons have left me high and dry and twitching for more Recycled crafting ;)


Saturday, March 10, 2012

Crochet: Spike Stitch Blanket Pattern


So here it is my first Crochet Blanket Pattern as requested, I'm not a pattern writer I just wing it so please let me know if this doesn't make sense. It's just exactly what I did to make each of the two Blankets which measure 40 inches x 46 inches.

I'm taking this opportunity also to instil my 'You catch more flies with Honey than Vinegar policy', i.e if you're taking time to read my blog and you like what I do then please let me know, I'm happy to write a tutorial or pattern so that you can make one for yourself but please and thank yous are super important to me, I'm old skool like that ;) Bloggers are people too, busy people with families, jobs and feelings so spread some love and be nice to us xoxo

Ok, back on track. So the principle thing to remember with spike stitch is that your initial Chain must be a multiple of 4, then add 1.

Note: All terminology given in US terms, for my UK peeps a Single Crochet in US terms is the same as  Double Crochet.

Hook: 6mm (I)

Yarn requirements: 2 x 454g(1 lb ball) Worsted Weight Yarn In Main Colour (MC) and Contrast Colour (CC)

Edging requires extra, a small Red Heart Super Saver Yarn ball in Main colour or any Worsted Weight Yarn (7oz/198g; 364yd/333m) is perfect to finish this off.

Foundation: In Main colour (MC) Chain 101

Row 1: Single Crochet (Sc) in to 3rd chain (Ch) from hook, sc to end, ch 1 turn.

Rows 2 - 5: Sc across to end, Ch 1 turn

Row 6: Sc across to end, Fasten off, Change to Contrast Colour (CC)

Row 7: This is where you have fun and make the zigzag pattern Ch 1 (counts as first Sc) 1 sc into stitch (st) 2 rows below, 1sc into st 3 rows below, 1sc into st 4 rows below, repeat this to end of row, Ch 1 turn.

Note: The design you make is dependent on the length of your stitches in this row, i.e. you can change this up and sc into e.g 2 st below, 4 st below then 3 st below, as long as you repeat the same pattern it will work.

Rows 8 - 10: Work 3 rows of Sc in CC.

Repeat rows 7 to 10 alternating between the Main Colour and contrast colour, always completing 4 rows of each colour in total (this includes the spiky fun row)

For your blanket to reach 40 x 46 inches you should have 50 'stripes' of colour. Want it longer? then just keep going. Fasten off when you're happy with the length.

Edging: With Main Colour, Join in a corner with slip stitch (sl) then sc ch1 sc, Sc into each stitch around repeating the sc, ch1 sc for each corner. When you get back round to the first stitch join with a sl st to first sc then ch 1 (counts as first st) and repeat the sc edging 3 more times or until happy with the size of the border. Fasten off.

Last step: Take two paces back and admire your blanket then thank yours truly xoxo

If you do make one I'd love to see, send me a pic at ruby_murray@ymail.com


Shared here
A Round Tuit Linky Party

Tuesday, March 6, 2012

Crochet: Getting Prickly with Spike Stitch


I've been without my beloved Bessie for a fair few weeks now so Crochet has been my craft of quiet desperation choice, I'll admit to being addicted to Giant Granny Square Blankets so it was time to branch out and try some more interesting stitches. Spike Stitch has been my first try and I love it, it Crochets up a nice thick blanket and it looks like Herringbone from across a room which is a winner for me. Both of these blankets are a generous crib size that almost cover a single bed ( US/Canada = Twin)

Crochet newbies might be put off by what looks a complicated stitch but the secret is (ssshhhhh) it's just Single Crochet, downside is that it takes longer because the stitch is smaller, but I just love the look of Noah and baby G's blankets.


The reverse side even looks interesting and spiky too.

 Not quite able to put down my hook, I'd been planning on making a Leather Kindle cover for Mr Ruby Murray but with sewing machine out of action I tried one in Crochet again with Spike stitch, this time using a Black and White Eco yarn made from recycled plastic bottles  ($1 store purchase no less!) and a Cotton yarn in an obnoxious Lime Green (this one's for you Lime Riot!)


Spike Stitch was perfect for this project, it gives a great cushioned fabric for the Kindle and using Lime Green meant no accidental sitting on the uncovered Kindle, winner winner Chicken Dinner :)

Sick Sewing Machine update: Bessie due back from rehab tomorrow.

Monday, February 13, 2012

(Sings slightly off key) Love Love Love

IHeartYou


I have to say I always honour Valentines Day by sending a card to my fabtastic hubby and son but I'm not at all fussed about gifts, I would however have a crap load of fun making these lovely crafty projects to festoon the turrets at Ruby Murray Heights ;)

Some last minute, skid in on your knees but simply beautiful projects to get you on a Valentines crafting spree.


Pinned Image

I'm a fairly newbie to Crochet but these worked up so quickly I made a ton just sat down in front of a movie the other week.


feltheartchain_ ornament1.jpg 

This is sooooo simple but effective and a great way to use up leftover red felt from Xmas.

Thanks for the well wishes, I'm feeling great just short on time at the moment as to be expected, Gabrielle is the perfect little baby, she eats and sleeps like a dream (she also poops like a nightmare, but let's not ruin the image hey!)

Thursday, August 18, 2011

A little Pot never hurt anybody right?


Yup my cheekiness knows no bounds, and whilst I have caught a serious case of the Summer laziness with regards to my sewing, I've still been fiddling about with Crochet, one decorative filet Crochet project, my first, that just needs to be blocked. I am a wimp and have been putting it off for a month now Grrrrr, at least I have these to show you, and lo and behold my first Crochet pattern, been feeling like I've neglected you guys on the tue front since getting pregnant and wearing tents instead of vintage refashions :)

Anyway I'd been trying to get my hands on a stash of cheap cotton Kitchen twine for a while to try these out and lo and behold my new local $ store carries 200ft for $1 winner! so I filled my boots, pockets and even a hand basket ;) and got twiddling these up. I'll warn you know they are so addictive and whilst they are available made for you already at Ikea, my version has no queues, no map stress, no screaming kiddo meltdowns and will not have you spending $100's of bucks on lovely stuff you want but don't need, all four costs $5 in total.

LIDAN Basket, set of 2, white
http://www.ikea.com/ca/en/catalog/products/90081290


Crochet hook size 3.5mm for small and Medium and teeny and 4.00 for Large

Yarny type stuff: Cheapo Cotton Dollar store Kitchen String (Yup I'm super picky!
Starting off: Chain 6 then join into a circle with a slip stitch

Round 1. Chain 1, 12 sc into ring
Round 2. Sc into each of previous rounds 12 sc, use a contrast piece of yarn as a stitch marker.
Round 3. Work 2sc in each sc around
Round 4. Work 1sc into each sc around
Round 5. 1sc in first sc then 2 sc in next, repeat to end
Rounds 6 & 7. Work 1sc into each sc around
Round 8. Work 1 sc in each of first 2 sc, 2 sc in next sc, repeat to end
Rounds 9 & 10. Work 1sc into each sc around
Round 11. Work 1 sc into each of first 3sc, 2 sc in next sc, repeat to end
Rounds 12 & 13 Work sc into each sc around
Round 14. Work 1 sc into each of first 4sc, 2 sc in next sc, repeat to end
Round 15 & 16. Work sc into each sc around.
Round 17. Slip stitch into first stitch of previous round and weave in ends

Notes: Follow to end of pattern for Large, then continue rounds of sc in each stitch until pot has reached the desired height, then slipstitch to first stitch of previous round and weave in ends.

Follow to round 13 for Medium,   ''
Follow to round 10 for Small,    ''
Follow to round 7 for Teeny      ''

Remember to make it taller than you think it needs to be as it'll be less floppy if it has a fold over top.

Want a bigger pot? keep on increasing and working 2 rounds of sc after until you reach the size you like.
Related Posts Plugin for WordPress, Blogger...
01 09 10