Showing posts with label scrap. Show all posts
Showing posts with label scrap. Show all posts
Wednesday, February 6, 2013
Dresden Doll Quilt
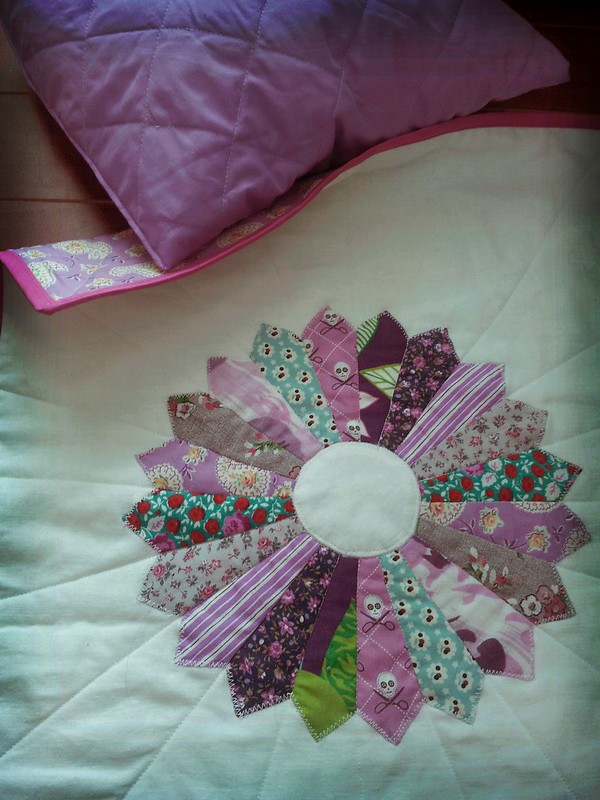
Here is a Christmas gift I made for a special little girl in my bff's family. It's sized for an 18'' doll and I've been reliably informed that the said doll is very pleased with her bed set.
Just a very simple quilt, one lone Dresden in some Grey and Purple fabrics that as usual are either Reuse centre finds, thrifted or gifted to me.
I've been obsessed with Dresdens since I got a Dresden template ruler, best Christmas gift everrrrr. I couldn't help but make a Dresden applique in each colour in my fabric stash, each one looked more like a flower than the next and I just couldn't help myself so expect some more quilty goodies coming up.
I'm really feeling Quilting this year, a few Christmas projects got me in the groove and I may even finish my baby girls quilt sometime this year (onset of Mama guilt occurring imminently)
What's coming next? A taste of the beautiful vintage ribbons I received as a gift. Since my Camera gave up the ghost in the middle of my baby girls 1st birthday, I'm struggling to produce the Crocheted Edge Notebook Tutorial, it'll happen by hook or by crook but expect lots more randomness until then, you know how I do ;)
Tuesday, July 31, 2012
Christmas in July - Mini Wreaths
All month I've been consumed by Christmas excitement, mainly because I have so many mosquito bites that Summer is now dead to me, and I'm hankering for some scarf and woolly hat weather.
These mini wreaths started off as a Cardboard tea bag box, then using a large and small Circle punch I whipped the bases up in no time. Then wrapped them with pipe cleaners, Beads, sequins and ribbons from my 'too small to be of use' ribbon box.
As usual I made a ton, so I'll be scattering these liberally around my tree and handmade gift wrap this year. Don't they look cute all lined up?
This project idea came from Martha Stewarts Handmade Holiday Crafts book, my oldest younger sis Hannah bought this for me, she must be buttering me up, or maybe she still feels guilty about the year she bought me a 50p scented candle, or Candle-gate as it has since become known as ;)
Note: Clicking on the link doesn't mean I get paid, just wanted to show you the inside of the book via Amazon.com
These mini wreaths started off as a Cardboard tea bag box, then using a large and small Circle punch I whipped the bases up in no time. Then wrapped them with pipe cleaners, Beads, sequins and ribbons from my 'too small to be of use' ribbon box.
As usual I made a ton, so I'll be scattering these liberally around my tree and handmade gift wrap this year. Don't they look cute all lined up?
This project idea came from Martha Stewarts Handmade Holiday Crafts book, my oldest younger sis Hannah bought this for me, she must be buttering me up, or maybe she still feels guilty about the year she bought me a 50p scented candle, or Candle-gate as it has since become known as ;)
For size reference, I'm always amazed at how Sausage like my fingers look on closeups ;)
More unseasonal Christmas projects coming up, looks like a Christmas in July, August, September ...
Note: Clicking on the link doesn't mean I get paid, just wanted to show you the inside of the book via Amazon.com
Labels:
Gift Wrap Ideas
,
recycle
,
scrap
,
Teeny tiny
,
xmas
Monday, July 16, 2012
Vintage Style Scrap Fabric Strawberries - Yum!
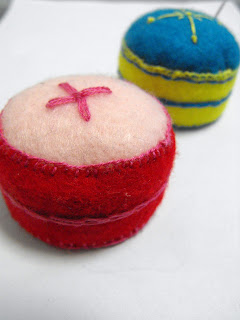
I have sooo many scraps it's unreal, so I made me a vintage style fabric Strawberry pin cushion, and then I made another, and another and another, in fact I couldn't stop, 23 later I stopped. What am I going to do with all these beauties? Who knows, but it sure was a fun Summer project.
Experimenting with tops, Jumbo rick rack was my favourite once I'd played around and got the hang of it.
Am I the only one that gets obsessive with my crafting, getting stuck on repeat, repeat, repeat rep...
What can't you stop making?
Labels:
Rick Rack
,
scrap
,
sewing
,
Teeny tiny
Tuesday, February 28, 2012
Scrappy Star - My foray into the murky world of Quilting Techniques
Now I'd been dying to try this out since I saw the technique in this book I snagged for $2 at our library book sale.
It's another project I managed to get done in the last week of pregnancy, it's painstakingly (not a word I often use when referring to my own work!) ironed (again a foreign word in my house!) and hand stitched in layers one over the top of the other to hide the raw edges. I love bias tape but I usually just wack it on and machine stitch down but this time I took the effort to hand stitch it so it's free of visible stitches for once. It's definitely not perfect but it was worth a try, I'm glad I had a bash at it and if I never dare to do this again I have this pretty piece of work to show for my efforts.
I've got my heart set on making a mini collection in baby Gabrielles nursery of vintage and vintage style pot holders, this will be joining that collection.
Close up of the ironed and stitched points of the star, I almost made a square from the stripes too... almost!
Now just need to get my butt out of the house and thrift me some more to hang up with this one. Any excuse to check out my beloved thrift stores.
Shared here
Sunday, February 26, 2012
Leather ruffle necklace at P.S I made this
Not dropped off the face of the planet, still crafting away furiously but time at the old wind up pc is in short supply without a Toddler using me as a climbing frame and switching off the pc mid post, that and a rapidly growing baby nursing me into sleep mode!
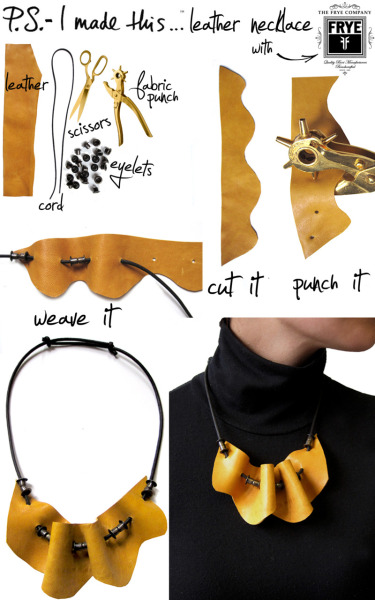
Here's a Leather jewelery tute I've been meaning to try since it popped up on my radar last year. Hope you enjoy and I'll be blogging about my own crafty endeavours soon enough.
Here's a Leather jewelery tute I've been meaning to try since it popped up on my radar last year. Hope you enjoy and I'll be blogging about my own crafty endeavours soon enough.
Love this idea, again great for scraps, it's girly and it looks easy peasy lemon squeezy (yep I'm bringing that saying back folks!)I never seem to be able to find those crazy looking fabric punches so I'll be trying mine out with a regular old paper punch and squeezing the hell out of it.
Wednesday, January 18, 2012
More Bottle Cap Cuteness - Pin Cushion
I have mentioned before about my Penpals and love of writing letters, well my good friend Spidermom and my latest Aussie penpal Becky are both interested in learning to sew. The crafting world is pretty addictive and before you know it the humble art of Cross Stitch leads to Embroidery and before you know it, you're staring at a sewing machine it's 3 am, you've got blood shot eyes and you're thinking how did this happen, yep be very wary of Cross Stitch, it's a gateway drug ;) Back on topic though, a great newbie sewing project is a pincushion, you need one so make it cute right?
Now these ones I made from a great tutorial using Bottle caps, they are hand stitched and dare I say embroidered (still no closer to Embroidery Mastery), I wanted a decent size so I used Juice Bottle caps. Making these is a great way to use up Felt scraps and small pieces of embroidery floss you may also have a problem throwing away. Oh and did I mention that since my last foray into Milk Bottle top crafting I now cannot ditch any sized bottle tops. My poor hubby must groan everytime he sees I've made something from an otherwise unrecyclable item, he expects to come home one day and find me buried under a mountain of bottle caps... still what a way to go, bound to make it into my beloved Ripleys believe it or not Annual!
Another cute project is this adorable similarly made pincushion but without the felt, great for using up fabric and ribbon scraps.

I have some amazing embroiderers that read my blog, Spidermom and Lime Riot to name two that I'm sure would make some amazing versions of these.
The above are all hand stitched but below is a machine sewn Tutorial for an unbelievably cute pin cushion, could not resist one with a London theme.

Check out this amazing list of 22 Free Pin cushion patterns mostly machine sewn, these are my two faves.


The Little house by the sea - Toadstool pincushion
P.s Last day before due date, Quilt top sewn together, still no curtains in the nursery and it's -43 with the windchill, here's hoping baby can hold on til warmer days :) extreme weather warnings in effect eeeeeeek.
Labels:
Bottle Tops
,
Embroidery
,
Felt
,
recycle
,
scrap
,
sewing
,
Teeny tiny
Thursday, December 15, 2011
Xmas Decoration Tutorial - Beribboned Trees

I am a sucker for handmade tree decorations, they don't have to be fancy, clever or time consuming, just simple suits me fine, and they don't come much more simple or quick than these. I've been trying this year to use up whatever I can of my scraps and my stash of, well everything. I'm sure I've mentioned it before but I collect even the smallest pieces of ribbon from anywhere I see them, handles from falling apart Paper and Card Bags, from the shoulders of new clothes etc etc, so I have a ton of too small to be useful pieces of ribbon in every colourway imaginable. I kept them in a shoe box just waiting for some idea to make them useful again, until now.
What you will need for this Tutorial:
Sheet of Green Felt or other non fraying fabric
Scraps of Brown Felt or other non fraying fabric
Old Cereal Box
Hot Glue Gun or a decent white glue
Scissors
A roll of 1/4 inch Ribbon
Scraps of assorted Lace/Ribbon/Trim of all sorts
Sturdy Needle
Chop stick/Toothpick/Skewer (will save you from burning your fingers if using Hot Glue gun)

1. Start out by cutting a template for your Trees from your old Cereal box, mine were roughly 3 inches high by 2 inches wide you could do them all free hand but as you'll need two triangles for each decoration you want them to match. Cut an even number of these from your Green felt, if you want 6 decorations cut 12 etc etc.
2. Now for the fun part, take out your ribbon scraps and decorate your trees, in one colour, multicoloured, however takes your fancy. Glue them down and leave a bit either side to wrap around the felt piece.
3. When all ribbons are stuck down, flip over the piece and glue down the ends of the ribbon. Using the toothpick/Chopstick/Skewer push down each ribbon end until they are secure.
Here you see the messy back part and the front looking all tidy with loose ends tucked away.
4. Next up cut a piece of Brown felt for the tree trunk roughly 1/2 inch by 4 inches, add glue along the back and fold it in half lengthways.
5. Stick the tree trunk to the messy side of your Tree piece and cut another card triangle just a hair smaller than your felt piece. If you made a template at the beginning use this to trace around then cut it smaller, trace the new smaller piece for other decorations, you need one for each tree. Take an undecorated triangle of Green felt and stick your smaller card triangle on to it, there should be a gap around it.
6. Glue both pieces together, making sure you seal up the edges (glue then press together) to stop the card showing. Next up Marvel at your creative skills then take a ribbon, thread your sturdy needle and pierce the top of the Tree (making sure you are poking the needle through the card), pull the ribbon all the way through and tie in a double knot. Knot the ends furthest way from the tree together to then hang your tree decs.
Done.

Other Ideas:
Make these as cute Gift Toppers, with Ink just stamp the persons name across one of the ribbons.
Then add a Card stand to the back and they could be Place cards.
pr leave as is but attach to the front of a card (using foam adhesive tape) for a reusable Xmas memento.
Hope you enjoy making these, I just kept going until I ran out of all my Green Felt leftover piecess.
Thursday, November 3, 2011
Denim Revisited - Denim Rose Tutorial


Wooohooo I've made a video tute, stagger back in amazement/amusement! after filming a great video tutorial then finding out I had no blinkin idea how to rotate it I had to film the whole thing again, I swear the first one had no umms, aahs or repetition (ooh sounds like a Timmy Mallet Wacaday rule!). Without further ado, here is the tutorial on how to twist and turn your Denim scraps into lovely Denim roses, use them on Hair clips, hair bands or whatever you like.
So you've heard me now, embarassing huh! answers on a postcard as to where you think my accent is from in the UK, no-one ever knows and even fellow Brits can never guess. 0 points for the South, 0 points for England :)
So what more can you expect? another Refashion tutorial coming up this week and a new series on Refashion starting soon.
Tuesday, November 1, 2011
Denim Revisited
My foot is now out of the Aircast (2nd day) but it's really slowing me down, I'm shuffling around like Ozzy Osbourne on Tranquilizers and it's been wearing me out, so the craft time formerly known as Noahs nap has reverted to Mama nap time too. I'm trying to get the hubby to video me making one of the Denim roses as I keep burning myself taking progress how to shots for the tutorial, yep sounds way funnier than irl :)
Until that's sorted, here's a project I made from a Michelemademe tutorial for my little fella, he absolutely loves it and it's made entirely from repurposed material, even the stuffing comes from 4 deflated pillows that had been languishing in my basement waiting for a makeover. It's not quite as elaborately embroidered as the original by Michele but I topstitched each seam instead and added a little bit of meagre embroidery to the top. I love how it turned out and Noah my little fella was dead chuffed with it too.
If you have a couple of Denim outfits that have out stayed their welcome in your closet, check out the Tutorial and stitch yourself some patchwork loveliness.
Michele made me - Denim pouf Tutorial
Stay tuned for more recycled lovelies and hello to my new readers :)
Tuesday, October 25, 2011
No Scraps Left Behind - Leather Round up
Wowsers I may be the only one but I've had a blast messing around with Leather, I'm drawing this theme to a close now and have some more great posts coming up on Denim, Cooking and even another a refashion Tutorial, seems like ages since I've sewn anything to wear and can't wait to share with you.
Poppytalk - Cowboy Boot to Wallet
I've purposely stayed away from anything that looks too technical but this I love, can't see myself cutting into a pair of boots to make a Wallet but I would love to own one of these, so cool and what a great refashion.
Love-aesthetics - Leather Envelope Clutch Tutorial
Easy peasy clutch, a cut and stick ready in a jiffy kind of project but a great gift idea.
![[Finished (4)[5].jpg]](http://lh3.ggpht.com/_SuZDtw4rhwA/TOwIB9OXFsI/AAAAAAAAMgo/F62HBXuWFNQ/s320/Finished+(4)%5B5%5D.jpg)
Stitch in My side Leather/Suede Flower Necklace Tutorial
I'm going to be keeping and eye out for any cool Leather projects and posting about them sporadically so if you couldn't beg, borrow or steal any Leather this time, keep checking back for more great posts from around the web.
Sunday, October 23, 2011
No scraps Left Behind - Leather Mini Cuteness Tutorial 3
Ok call me obsessed but I still have a shed load of Leather scraps and then it dawned on me that I had an 80's monstrosity in Red Suede so I've been carving a path through that this weekend.
Inspired by this super duper miniature tutorial Bored and Crafty - Mini Satchel I got busy with some teeny tiny pieces that were quick to make and would make such cute Christmas Brooches, gift Toppers or just Xmas ornaments and yep, still on the Christmas jag!


1. Make a pattern on card for your Mittens, I suggest making it no smaller than mine which were 2 1/4'' long and 1 1/4'' at the widest point (the thumb piece), any smaller and you're going to have trouble turning it . Cut out the pattern from a piece of suede/suedette/Leather/Vinyl, whatever you have on hand, making sure to flip the pattern piece for two of the pieces.
3. Cut closer into the seam allowance if you have some wide areas, then cut up to but not throught the gap between the thumb and the mitten. Then cut teeny triangles out of the round areas this will help when you come to turn.
4. Before turning right side out, ensure that you have no holes in the mitten, it's easy to cut too close or through the stitches so you'll want to check for this now and stitch up those areas.
Then poke your finger into the mitten turning the finger ends inside, keep poking and wiggling until it's the right way out, using a hairpin will help to tease the thumb piece out. Keep playing with it until the edges are nice and round.
6. Now for the fun bit, with some Lace and hot glue, glue the Lace to the centre of the back of the Mitten and bit by bit glue and wrap the Lace around it until it meets the start point, you'll want to hide your stitches and leave a little over the edge for decoration.
Hold those teeny tiny Mittens in your hand then realise that everything looks cuter with a bow. Cut a strip of your fabric and tie a tiny bow, using a pin to help you, glue it on, revel in the tiny cuteness.
No Tute for the teeny tiny Clutch, however using the Tute linked to above is a great starting point then have fun.
Ok have fun with the rest of your weekend and if you liked this Tutorial let me know :)

Inspired by this super duper miniature tutorial Bored and Crafty - Mini Satchel I got busy with some teeny tiny pieces that were quick to make and would make such cute Christmas Brooches, gift Toppers or just Xmas ornaments and yep, still on the Christmas jag!


2. Putting right sides together, stitch carefully as close to the edge as possible, back stitch to reinforce at stopping and start points.
3. Cut closer into the seam allowance if you have some wide areas, then cut up to but not throught the gap between the thumb and the mitten. Then cut teeny triangles out of the round areas this will help when you come to turn.
4. Before turning right side out, ensure that you have no holes in the mitten, it's easy to cut too close or through the stitches so you'll want to check for this now and stitch up those areas.
Then poke your finger into the mitten turning the finger ends inside, keep poking and wiggling until it's the right way out, using a hairpin will help to tease the thumb piece out. Keep playing with it until the edges are nice and round.
5. No one likes a lost Mitten so pop a piece of ribbon 2 inches long inside one Mitten and stitch closed, following the pic below pop the other end in the other Mitten and stitch closed, you want the thumbs to be facing when they're finished.
6. Now for the fun bit, with some Lace and hot glue, glue the Lace to the centre of the back of the Mitten and bit by bit glue and wrap the Lace around it until it meets the start point, you'll want to hide your stitches and leave a little over the edge for decoration.
Hold those teeny tiny Mittens in your hand then realise that everything looks cuter with a bow. Cut a strip of your fabric and tie a tiny bow, using a pin to help you, glue it on, revel in the tiny cuteness.
Just for fun here is the 'donor' of all this lovely red Suede, amazingly this looks worse on, I's have trouble getting through doors head on!
No Tute for the teeny tiny Clutch, however using the Tute linked to above is a great starting point then have fun.
Ok have fun with the rest of your weekend and if you liked this Tutorial let me know :)

Labels:
2011
,
Leather
,
scrap
,
Teeny tiny
,
Tutorial
Subscribe to:
Posts
(
Atom
)

