Showing posts with label xmas. Show all posts

Tuesday, November 27, 2012

Best of British - Christmas Tree Decorations


Furiously crafting for Christmas? check out these cute tree decs, would love some of these on my tree this season.


Via. A Bit of home $7.99 (CAD)


Via Selfridges STG 5.95


Friday, October 26, 2012

Freebie project from Mollie Makes - Cross stitch Critters


I love these, kinda Halloweeny, but still cool for stocking stuffers. Did you know it's only 60 sleeps til Dec 25th my lovelies, don't say I didn't warn you it was coming, (since like June!!)

The pattern has the charts for 6 creepy cute monsters and instructions for stuffies, pencil cases and a few other projects. Such a great idea for hard to craft for boys or girls.
 
 
This Freebie project comes from The Making Spot the craft site of UK Magazine Mollie Makes. You'll need to sign up (Free) and add it to your cart but then it's free to download. I love the Magazine but can't always get hold of it in Canada so it's great to know that most of the projects are available to buy and sometimes free on their site, yippee!

They have 50% off their Halloween projects right now so go have a look, between 26th - 28th October they are also featuring free Haloween projects on The Making Spot Blog.

Enjoy
x

Saturday, September 1, 2012

Salt Dough - Not Just for Christmas


They say that by embracing the activities you enjoyed as a kid Adults can de-stress, and by 'they' I mean Travis from Cougar Town, woah been seriously overdoing the Cougar Town recently.

So I've been rolling up my sleeves and getting my hands dirty with some Salt Dough Xmas ornaments as you know, and it turns out that there are some pretty cool projects on the web and not all Holiday themed either.

Here's my pick of Salt Dough projects from around and about.

First pic - The Desperate Craftwives - Starfish garland Tutorial
Love the beachy feel of the starfish, would love these as curtain tiebacks in the bathroom.

salt dough pendants


Floral may not be your style but using stamps or anything with texture the possibilities are endless and with one batch you could make trays and trays full of these, great for you craft market sellers and such an inexpensive medium you'd be Quids/Dollars in.

June, from Celtic Moon Craft if you're reading this, I would love to see you make these pendants in your beautiful Traditional Celtic style .
 
 
Oleander and Palm - Salt Dough Christmas Ornaments

Also a great idea for gift tags all year round, stamp names on for place settings, tie round napkins for handmade napkin holders, so many uses and who doesn't have a round cookie cutter and a few stamps kicking about.
 
Had to sneak some more Christmas projects in for those feeling me on the hurry up Winter front.


Thursday, August 30, 2012

Salt Dough Christmas Tree Ornaments

 
Ok, ok you guys are sick of my Xmas obsession? well I made it so I'm sharing, family members look away please, these may or may not be winging their ways to you sometime snowier ;)
 
I had a lot of fun making these, I don't profess to know how to paint, so I'm going for 'rustic' looking, fun ornaments not works of art, if I can't get the look I want with a dot or a broad sweep of a paint pen/brush then it's not happening.


My personal faves, Gingerbread men and Ladies complete with painted nails and pearl jewelery ;)
 
My kitchen is literally like Santas Grotto at the moment so I'll be easing off the Xmas projects... for now.

Thursday, August 9, 2012

Scandinavian Style Red Xmas Sampler


My fave place for Crafty finds in Edmonton is my beloved Reuse Centre, on a trip a year ago I picked up this picture, it had no date, no info on who designed the pattern, all I could tell is that it's the front of a Xmas card, and reading the back told me that the lady writing the card has (come close, closer, closer still,  let me whisper in your ear,  ahem, bladder problems) so clearly no clues there.

I've been digging Xmas projects recently and the picture was the exact same size as 14 ct Aida so it was easy enough to copy each stitch, I changed a few up because, well to be frank the Reindeer looked like he was projectile pooping, one small stitch across soon solved that problem.

Still I have no idea who to thank for this amazing pattern, and I would dearly love to make this available on my blog for your use as well.

 Original Front and back.


The whole shebang, excuse the wonky photo, the stitching is fine I promise.

Any copyright/needlepoint Geniuses (Geniui?) that can shed some light on where this pattern hails from? and if I can the pattern on my blog beyond a close up photo of my work?


Shared here


Photobucket

Tuesday, July 31, 2012

Christmas in July - Mini Wreaths

All month I've been consumed by Christmas excitement, mainly because I have so many mosquito bites that Summer is now dead to me, and I'm hankering for some scarf and woolly hat weather.


These mini wreaths started off as a Cardboard tea bag box, then using a large and small Circle punch I whipped the bases up in no time. Then wrapped them with pipe cleaners, Beads, sequins and ribbons from my 'too small to be of use' ribbon box.


As usual I made a ton, so I'll be scattering these liberally around my tree and handmade gift wrap this year. Don't they look cute all lined up?


This project idea came from Martha Stewarts Handmade Holiday Crafts book, my oldest younger sis Hannah bought this for me, she must be buttering me up, or maybe she still feels guilty about the year she bought me a 50p scented candle, or Candle-gate as it has since become known as ;)

For size reference, I'm always amazed at how Sausage like my fingers look on closeups ;)

More unseasonal Christmas projects coming up, looks like a Christmas in July, August, September ...


Note: Clicking on the link doesn't mean I get paid, just wanted to show you the inside of the book via Amazon.com

Friday, April 20, 2012

Ways with Vintage Maps - Washi Tape Notebooks


It's been ages since I did a recycled project and since I have (not surprisingly) a hoard of old and outdated Maps/Atlases hanging around, add some $1 store mini composition books, some double sided tape and bust them out into these 3 gorgeous and all slightly different notebooks.


I had the craziest time making these, the pages I used were just random but ended up being in the US (remember I'm from the UK)  and each time I added a stripe, I found names and places I'd lived in or my family lived in, I made one which ended up going to my Mum, when I looked closely it had her current city, the name of her favourite residence, not the city mind you, the actual name of the house, her Fathers name and when I looked at the back of the book it even had her name, not a common one either, it's Jeannette. Crazy huh. Not sure this would work the same for you if you're reading this from Kuala Lumpur mind you!!

And since you'll have some maps pieces leftover, even your parcel could get a little sprucing up, I found a globe in my Atlas but even a Flag would look cool too.


Wouldn't these make great Fathers Day gifts or a farewell gift for someone just about to go travelling.

Just working on a tutorial for these for you so watch this space...

Wednesday, April 18, 2012

Ways with Vintage Maps - Washi Tape Tutorial


It's been ages since I busted out a recycling project, and who doesn't love a great idea using Vintage Map/Atlases, not surprisingly I also have a hoard of these kicking about, just can't seem to pass up an old dusty 1970's Atlas, hmmmmm the smell of a dusty old hardback! This week I'll be bringing you  projects using old maps/Atlases and shock horror old Geography text books (sorry to my high school Geog teacher Mr Bumchin, I mean Mr Bunting!)

This one is so simple but just in case, here's how to make your own Map Washi Tape.

What you need:

Scissors
Double Sided Tape
Old Map/Atlas - Use a page with a mix of land mass and sea for colourful tape.
Decide which side of the paper is most attractive, the flip side of mine had text so that was an easy choice.

Lay the double sided tape down horizontally and in a fairly straight line across the map/Atlas page you want to be able to read the places, that's the fun part.


Leave a small gap between each piece of tape to make it easier to cut out.

Marvel at your cute pieces of tape, peel off the back then use them for parcels, sticking down envelopes, or some of the cute projects I have coming up this week...

.

Saturday, December 24, 2011

Good Ole Fashioned Brit Recipes - Mince Pies

Deep-filled mince pies


Presents wrapped, crafting/Dining table returned to its spotless condition of some 6 weeks ago, I've even ironed a table cloth (shock horror) and set the table for tomorrow, all that's left to do now is to scoff a ton of these beauties and rest my tired bones.

Courtesy of the amazing BBC Good Food Website here is our favourite Deep Filled Mince Pie recipe, we have a family recipe we used to make, but to be honest this one is so good, we even passed it on to my Mum who is a top Xmas cook.

http://www.bbcgoodfood.com/recipes/863652/deepfilled-mince-pies

Note: We changed up the 100g of Icing Sugar for 100g of Granulated Sugar and added a splash of milk to help bind the Pastry, it gave the Mince Pies a really tasty Shortbread style crust that is way better than any I've ever tasted before. 

Wishing you all a Merry Christmas, Happy Holidays or whatever you say in your house, oh and tomorrow it's a Blog Birthday for me, one year can't believe it.


Thursday, December 15, 2011

Xmas Decoration Tutorial - Beribboned Trees


I am a sucker for handmade tree decorations, they don't have to be fancy, clever or time consuming, just simple suits me fine, and they don't come much more simple or quick than these. I've been trying this year to use up whatever I can of my scraps and my stash of, well everything. I'm sure I've mentioned it before but I collect even the smallest pieces of ribbon from anywhere I see them, handles from falling apart Paper and Card Bags, from the shoulders of new clothes etc etc, so I have a ton of too small to be useful pieces of ribbon in every colourway imaginable. I kept them in a shoe box just waiting for some idea to make them useful again, until now.

What you will need for this Tutorial:
Sheet of Green Felt or other non fraying fabric
Scraps of Brown Felt or other non fraying fabric
Old Cereal Box
Hot Glue Gun or a decent white glue
Scissors
A roll of 1/4 inch Ribbon
Scraps of assorted Lace/Ribbon/Trim of all sorts
Sturdy Needle
Chop stick/Toothpick/Skewer (will save you from burning your fingers if using Hot Glue gun)


1. Start out by cutting a template for your Trees from your old Cereal box, mine were roughly 3 inches high by 2 inches wide you could do them all free hand but as you'll need two triangles for each decoration you want them to match. Cut an even number of these from your Green felt, if you want 6 decorations cut 12 etc etc.


2. Now for the fun part, take out your ribbon scraps and decorate your trees, in one colour, multicoloured, however takes your fancy. Glue them down and leave a bit either side to wrap around the felt piece.

3. When all ribbons are stuck down, flip over the piece and glue down the ends of the ribbon. Using the toothpick/Chopstick/Skewer push down each ribbon end until they are secure.

Here you see the messy back part and the front looking all tidy with loose ends tucked away.


4. Next up cut a piece of Brown felt for the tree trunk roughly 1/2 inch by 4 inches, add glue along the back and fold it in half lengthways.

 
5. Stick the tree trunk to the messy side of your Tree piece and cut another card triangle just a hair smaller than your felt piece. If you made a template at the beginning use this to trace around then cut it smaller, trace the new smaller piece for other decorations, you need one for each tree. Take an undecorated triangle of Green felt and stick your smaller card triangle on to it, there should be a gap around it.


6. Glue both pieces together, making sure you seal up the edges (glue then press together) to stop the card showing. Next up Marvel at your creative skills then take a ribbon, thread your sturdy needle and pierce the top of the Tree (making sure you are poking the needle through the card), pull the ribbon all the way through and tie in a double knot. Knot the ends furthest way from the tree together to then hang your tree decs.


Done.


Other Ideas:
Make these as cute Gift Toppers, with Ink just stamp the persons name across one of the ribbons.
Then add a Card stand to the back and they could be Place cards.
pr leave as is but attach to the front of a card (using foam adhesive tape) for a reusable Xmas memento.

Hope you enjoy making these, I just kept going until I ran out of all my Green Felt leftover piecess.

Tuesday, December 13, 2011

Miniature Cuteness - Letters to Father Christmas


So this cold has been kicking my butt for a week now but I'm finally getting better, my recovery I owe in part to this insanely cute project I made the other day. I've been so into making teeny tiny things of late that I may soon have to start a new tag for these new projects. It started out as a project for the little fella, then as these things usually do, I put too much detail into it then ended up worrying he might squish so now I'm going to have to make a bigger less destructible version that won't make me cry when he steps on it. Does that make me a bad Mama?


Teeny tiny packages and postcards, because you gotta go the whole hog right?


The hinged back door to remove the postal sack, yup they fit perfectly inside, and the felt made the door close properly too.


Just for scale here's a clothespin to show you how small this actually is.

Ok so it's cute, and I had everything in stash so it's in keeping with my 2011 pledge, but the BEST thing about this? the post box is made from an empty loo roll (Toilet roll), I used two in total plus a little corrugated card for the top, the mail bags were scrap pieces of fabric given to me and the only new fabric cut into was a sheet of red Felt and who doesn't have stacks of this come December.

Father Christmas, Pere Noel, Santa Claus, Sinta Klauss,  whatever you call the jolly fella that stuffs your stockings, hope this put some Xmas cheer in your day. :)

A quick glimpse of the next Tutorial coming up


Shared on


Saturday, December 10, 2011

Creative Gift Wrapping Ideas - Bows

I just can't help myself, I am a sucker for bows of all types, on everything, made of anything so the lovely creature comforts blog, yup again got me thinking about all of the different types of paper you could use to make this lovely paper gift topper bow.


I would love to see this made with pages of sheet music, cartoons, old Atlas pages, any old book pages, and how simple but perfect that the tails of the bow act as a gift tag, genius.

Please check out this tutorial and several more gift printables, a chain link garland and the most adorable bird printable wrap.


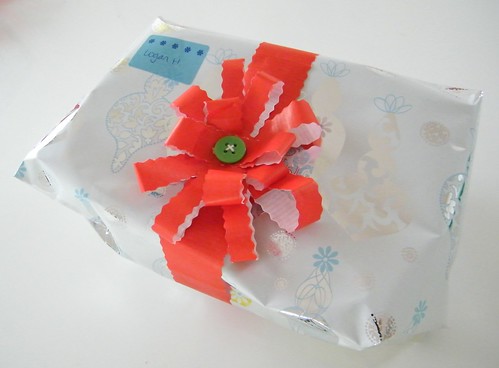
Made from leftover bits of gift wrap and a button too, perfect last minute-ran out of everything gift topper, and otherwise what do you do with those too small to be useful pieces of wrapping paper?


Ever wondered how to make these posh looking ribbon gift bows? check out this tutorial using of all gadgets, the humble embroidery hoop, bloody genius I hate the idea of going out and buying a specific tool to make these (one which I probably would not be able to work out with enlisting the hubster!) Stay awhile and check out Lines across my face, it's a great blog with some lovely ideas, check out her Felt Xmas Trees Tutorial(I've made a ton of these and just need to decorate them)


If you're a newbie crafter you could definitely do worse than make some of these for Xmas, why pay for them at stores then throw them away afterwards, make these out of anything paper from Music sheets, newspaper, comics etc. I love the idea of matchy matchy paper gift bow on wrapped present, esp newspaper or brown paper, you could get away with either of those for boys right?


Can't get these newspaper wrapped gifts out of my head courtesy of Sustainable baby steps thanks to Reduce Reuse Upcycle  for featuring the idea (lots of seasonal earth friendly projects here). Don't have a daily or free paper where you live? check out the library for a selection of free foreign language newspapers or use magazine paper.


And lastly just because I simply refuse to kick the Leather fascination (I swear 99% of my gifts have been made of repurposed leather this year) here is a gift bow made of Leather, it does require some tooling but I think you could easily follow these instructions using a lighter repurposed leather and a glue gun, it won't be as stiff as the hide used in the photo but you won't need any extra gear. This could be attached to a brooch back as a seasonal (or cute as heck all year round) extra gift.


Hope some of these amazing bloggers have offered up some food for thought and got you inspired to make wrapping a creative part of your Xmas, I love the idea of playing around with colours, unusual materials and textures, rough on smooth,  and also the idea of scale, teeny tiny bow on a Large gift? or great big gift topper on teeny tiny gift (like my Crocheted Rose), have fun and use what you have laying around.

Got some more ideas from around the web coming up, and also a Tutorial for a Xmas tree decoration that requires no sewing and could help you clear out your scraps bin, and an extra cute felt & recycling project I just finished that is almost too cute to look at without glasses.
Related Posts Plugin for WordPress, Blogger...
01 09 10