Showing posts with label recycle. Show all posts

Saturday, May 28, 2016

DIY: Leather Jacket to Suspender Skirt

20160528_165024[1]  

Hey friends, totally glossing over the fact that I've been mostly absent for around a year. No excuses, let's just hug like old friends (the good type that doesn't hide behind shampoo bottles at the grocery store instead of speak to each other) the type that actually want to 'do lunch' and then really call each other to make plans. Let's be those friends xoxo


So I'm always crafty #youknowdis and, yes I'll admit to being a supplies hoarder, and by supplies I mean erm anything that could be made into anything, so yep my craft room is pretty hazardous to walk through. Bags of hopeful fabric here, well meaning piles of future awesomeness there, seriously people my craft room is like Mary Poppins bag x Dr Who's Tardis.  One day I will fall and meet my end, buried by a pile of old jeans or Upholstery samples, my friends will say with teary eyes, it's how she would have wanted to go.


20160201_092517[1]

In a bid to tackle supply mountains, I promised myself that if I couldn't find something amazing to do with a pile of 70's Leather trench coats then I would have to (GASP) send them on to a new home via Salvation Army. Only when I had given myself such an ultimatum did those creative cogs start whirring and the Suspender Skirt (Braces skirt back home in England?) was born.


I was totally inspired by the Leather Pinafore dresses all over Pinterest and originally that was the plan until I remembered that A, I am not Miroslava Duma and B, Leather Boobage is way too cool and sexy to be worn to wash my dishes or pick up the kids. So leather bottom half it is!


I even managed to keep the original pockets and buttons although I had to change the placement. Can you see where the skirt starts on the original Jacket? Yup it's the waist seam, then I just hoisted that bad boy up, took it in and fashioned the straps from the belt that came with. Since that only covered one strap I used the Leather jacket facing for the other side. I crossed them at the back and that was it.


20160528_164851[1]

So what do you guys think? 

What would you have made out of that Mans Leather trench?


Thursday, June 25, 2015

Reupholstery - Transformers, Robots in Disguise!

Upholstery,  after pic, Transformers

Once upon a time there was a reading chair, it was old and the fabric was scratchy but it rocked many babies to sleep, Once those babies grew up and fell asleep on their own (sometimes even all night) the chair was left in the dark creepy part of the basement we lovingly refer to as La Dungeon.

There it was forgotten, and our pesky cats used it as a scratching post ggggrrrrrrr, those long ago stories and cuddles in the chair were but a distant memory.
 
Before pic, Needs an update

That poor sad chair sat and sulked for a while, until its owner had something very important to do, and really needed something meaty to dive into and get her procrastination on. She had a deadline to meet, a ton of alterations work, and a blog that had started to heal over it had been that long since she logged on. So of course one day she started ripping, and pulling the chair to pieces until it was quite nude and embarrassed.

That same owner had no idea what to dress the chair in, or even where it would live, until this crazy Transformers fabric jumped off the bargain wall (can you believe this was $2.50 a metre?) begging to be fixed up with a lonely chair that didn't get out much.
Transformers Chair, Upholstery,  After

To cut a long story short, they fell in love, invited some Denim and Red Vinyl over to party and lived happily ever after <3

This cutey patootie chair now lives in my sons big boy Superhero bedroom in the exact same spot it did when it used to rock him to sleep over a story or 5 which makes me a happy Mama.

Monday, September 8, 2014

Recycled Dolls House Kitchen Appliances

DSCF6703
 
Earlier in the year I shared the  Dolls House reveal, the renovated Dolls house for my little ladies 2nd birthday. The idea was to use recycled materials where possible, and I'm pretty chuffed (UK slang for happy/impressed) with the finished rooms.

Before (house furthest away)

482331_10151549914652526_1815972014_n (2)

A sneaky peak at the after


I fully intended to make all the furniture until it dawned on me that whilst I can boast some skills with Fabric, despite coming from a family of very talented Joiners, anything to do with woodworking and I am a complete idiot. Honestly at Woodworking classes as a teen I was so scared of the high speed sanding machine I waited until the end of class for the teacher to do mine.

 It's not so much that I'm scared of power tools, I'm just really, really, really clumsy and I know my limits. Yup call me a big girls blouse if you will, but I'll take your simple sand paper sheets over those high speed, whirring discs of death any day.

So I was certain that I needed the furniture to be made of wood but waiting for my lovely hubby to cut some for me was proving frustrating to say the least.

You know the joke "Ladies, if a man says he's going to do something, there's no need to remind him every 6 months" totally my husband, and to be honest we have a property that is knee deep in renovations so I get his reluctance to cut me some wood furniture.

Cue a very handy Garage sale buy, a bag of Wooden kids building blocks, plain sanded wood in useable cube shapes. $2 later, some Acrylic paint and I have all I need to get cracking.

I started with the oven, the backs of Safety eyes was perfect for the burner rings, add some Mod Podge dimensional medium over a metallic pen and I had something resembling a Cooker!

DSCF6710

The dishwasher was even easier, a few dots for buttons and a line with a black sharpie worked wonders for the door. Anything that I wanted to appear 3D I added a drop of the dimensional gel and it dried glossy, with the 3 Dimensional look I was going for.

DSCF6708

I don't profess to be a talented painter, but what the heck, they were fun to make and they passed muster with the little lady, too big for her to eat and heavy enough for her not to break! winner winner Chicken dinner!

Saturday, March 1, 2014

Dolls House Reveal


This project rocked my world, it was so much fun that for a while I'm ashamed to admit, I teetered on the murky edges of crazy Victorian doll house lady. To date I still have 4 others in varying states of repair awaiting loveliness.

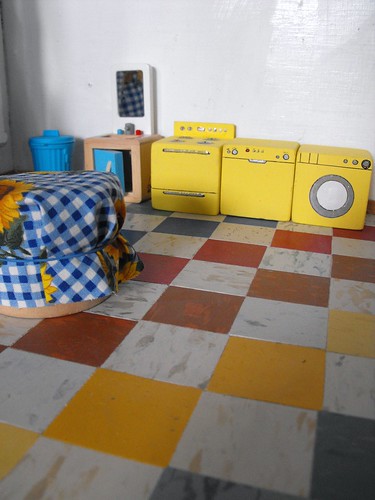
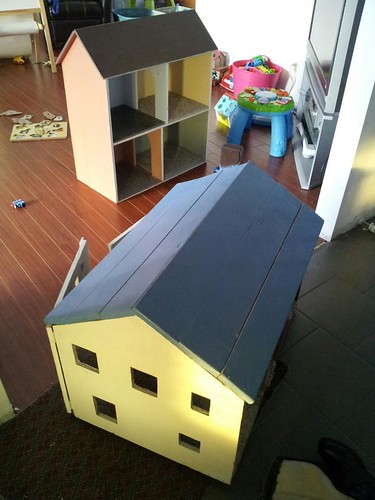
Ok so 5 sounds a bit much? but they kept finding me and they were in need of tlc I just couldn't resist, like this gorgeous 1960's style open sided house. Can you believe this was just $1.50? craziness!


One thing that I learnt, is that these miniature bits and bobs may be small but the prices are anything but and since my little lady is somewhat of a Tasmanian Devil, (seriously, her Indian name would be "Raised-by-Wolves")I knew I had to make everything easily replaceable should they be stamped on/swallowed/flushed away! That's where I decided to make as much as I could from items I already have and keep everything else low cost.

Aside from the wood furniture, all flooring and home furnishings were made by me. Original plans to make everything proved way too time consuming, yep the bitter reality sank in that everything would indeed be shoved in baby G's mouth or nostril or a mixed combo of the two.

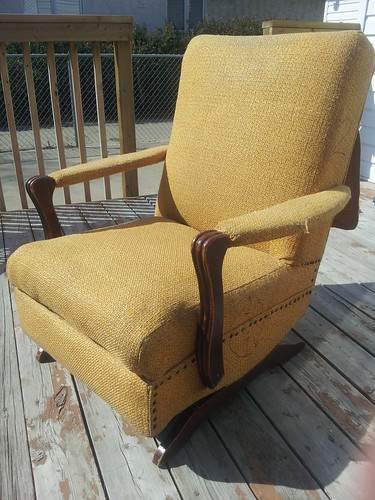
So here is the starting point, a very blah looking unloved but sturdy Wooden Dolls house, rubber cemented down Carpet sample? check, 80's paint job? check? time to get to work.


Top one is the poor unloved shell pre-makeover.


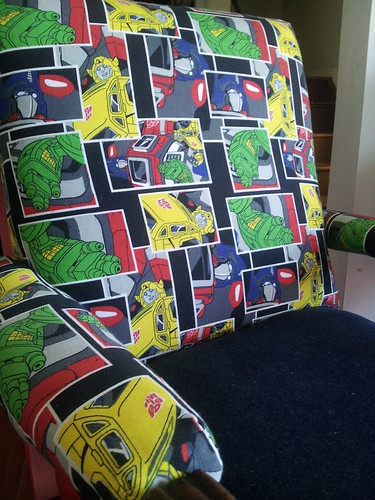
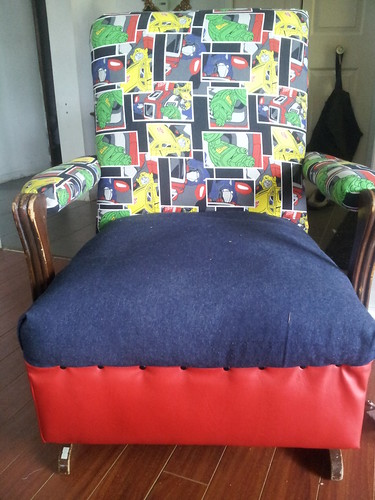
I played around with the design of the rooms and the style, first opting for something bright and modern. Check out the knitted Ottoman and cushion, knitted using toothpicks (yes I am ridiculous but it was fun) and Embroidery floss.

In the end I decided on a mix of old and new, some gorgeous Vintage fabric and a small remnant of Contact paper gave me some inspiration for colour schemes. Now to start the demolition!

I ripped out the carpet, the single kitchen tile floor and cut new floors to make it easier to change them away from the dollshouse itself.

Would you believe that all the flooring was not only FREE but RECYCLED too? double points!


Bedroom Hardwood looking flooring is actually an old Bamboo blind.
White flooring is made from popsicle sticks, which took me hours, lesson learnt, Bamboo blinds all the way baby! so quick and easy and the indentations from the blind cords made it looks like planks of wood.


Kitchen flooring is real Composite tiles sourced from Freecycle, a sample pack of 2x2 tiles cut down, glued then grouted, so pleased with the finished look of this and the fact that it's not only rainbow but real kitchen tiles made me smile.


The curtain rods were small wooden dowels I had in my stash and worked perfectly with cup hooks to keep them in place. It took my little lady at least an hour to pull the rods out but they were popped back in easily, crisis averted.

 
After searching in vain for some scalloped wooden trim to add to the sides of the under roof area I ended up using some cereal box card and a Dollar and tracing my own, a couple of licks of pink paint and we were on to a winner.
 
The vintage looking roof was created using Dollar store drawer liner, I loved how this turned out, and it smelt like Roses the whole time I was papering it. It was pretty lumpy on first application so I sanded it once it had dried and the lumps disappeared and a gorgeous aged, worn in look came about, and all for $3? score!
 
Ok ready for the Royal tour?


First the Living room, wall colour not yet decided so some colourful accessories brightened up the room,

 
The Sofa I made from scratch, stitched from real Leather, a block of wood, card and some stuffing, my first try at mini furniture and it's pretty realistic non?
Faux Acrylic Coffee Table is from the base of a Palmolive washing up liquid bottle, Patchwork rug is chopped up from small carpet samples. Ottoman is a mini Playdo tub covered in recycled shoe leather. Table lamp is a dollar store bubble solution bottle, and lamp shade is scrap fabric covered piece of plastic canvas folded and stitched together.

 
Downstairs bathroom or Kitchen as it will be when we add more furniture to the house. Brings back memories of our Portsmouth Victorian terrace with the (only) Bathroom off the kitchen! 
 
 
Furniture is by Hape, the blue backsplash is a scrap of contact paper stuck to a piece of cereal box and the bin is a $1 toy we had kicking around. Check out the wooden duck and the mini towel, and erm if you look really closely, doesn't the shower look like a teeny weeny pair of mens dangly parts? ok just me then?


I added a menu board for when the Kitchen furniture is in place, just some corrugated card covered with painted popsicle sticks and sanded for a rustic look, and the best bit? it is actually a chalk board painted with chalkboard paint, can't find and miniature chalk mind you, but it's the crazy, up all night, should be asleep thought that counts right?!

Moving up the imaginary staircase to the bedrooms, here we arrive in the Master bedroom


Bamboo blind flooring, vintage fabric glued to the walls and a faux chair rail and baseboards/skirting boards were bamboo blind pieces again, such a great source of wood that didn't need staining.

A vintage eyelet doily for a rug, two Hexagonal Brass drawer knobs as bedside tables and some more miniature sewing.


I hated the way that bedding never sat flat when I was little, so I just sewed a tiny pintuck down each side of the bedspread, it did the trick and looks a bit more realistic. The pink cushion is knitted again with Embroidery floss and toothpicks.


The Dresser was given to me and the 'fabric' inside is bias tape or lace seam binding glued and folded around a small piece of cardboard.
 
Saving the best to last, here is the childrens room. The furniture again is Hape, so cute and fun, every detail is thought of.

 
The rug is some bakers twine looking cotton yarn I had, I just twisted it around a piece of cereal box card and glued as I went, love the rag rug look it has.

 
Faux cow hide rug is some minky fabric scrap simply cut in a erm, dead cow shape. Check out the amazing vintage contact paper, I love this design and the fact it has England, Canada, France, Germany and Greece on it and the illustrations are so cute. 

 
The flooring is popsicle sticks sanded cut and painted once stuck down, long time in the making but I do love how it turned out.


The curtains I made and added ribbon tie backs then draped a small piece of pompom trim over the top.

 
The whole shebang.
 Soooo still with me? still awake? understand why this project was a year in the making?... and just remember I have FOUR more of the suckers to finish lol.


Coming up? some actual real life not teeny tiny at all Sewing!


Shared here


Sunday, February 2, 2014

Part 4 Felty Sweater Blanket Tutorial - Finishing up


Firstly, the irony that I almost did  not finish this 'finishing up' tutorial is not lost on me, I have been umming and ahhing about continuing with the blog after being given a sweet sewing gig that I need so much more time than I have access to. I really do love to blog so I'm toughing it out and will be trying to post once a week to get back in the swing of things. I love you guys for sticking with me when things go quiet xoxo

Moving on,


The series so far;

Pt 1 - Collecting your Sweater stash
Pt 2 - Buying and Felting your sweaters
Pt 3 - Piecing together your Blanket

Finishing your felted sweater Blanket

You arranged your patchwork strips into an arrangement you love and now need to pull this project together into something you want to throw over your chair to show off your handiwork.

Good news is that there are lots of options for finishing your blanket.

Easiest option

It's not even cheating if you just cut your lose threads and call it a day, Felted sweaters will not unravel providing they were felted enough in the first place. If when you cut the sweater pieces up they didn't run or unravel you are safe with this option.

Sure your seams will show but if you like the look of them go with it, put your feet up under your new blanket and grab a cuppa!


Intermediate Options

I backed my blanket and added batting for extra warmth, here's how.

1. With wrong sides together of your blanket and your backing fabric, stitch around all four sides leaving an opening (unstitched area) of approx 8 inches (depending on your blanket size). Back stitch either side of the opening to make sure the stitches don't pull apart during the next step.

2. Flip the blanket inside out until the right side is showing. If you choose to use batting pop it inside your blanket now, first cutting around the blanket as a template and then trimming as necessary if it doesn't lay flat inside the blanket , 1/4 to 1/2 inch should be enough.

3. Hand stitch the opening closed using a Whip stitch or any small stitches that will not easily be seen.

Note: Adding an additional layer between the batting will require some tying or quilting to secure all the layers together, this can be as simple as tying small knots or making small running stitches at regular intervals. I tied knots every corner of every square in my version.

If your fabric layers are stretching, try lowering your feed dogs or adding sticky tape to the underside of the sewing machine foot to help it move more easily over the fabric. A walking foot may also help if you have one. None of those working for you? Get handstitching, there's no shame in it!

Experienced Options

If you are no stranger to bias tape then finish this sucker off with a contrasting bias tape will really showcase your skills, bear in mind the knit fabric will have some stretch and this may require handstitching throughout.


Extra flourish

Try embroidering around the edges in Blanket stitch in a bright colour to show off your stitches, this is a nice step to take if you hand stitched the blanket together.


Coming up? I step into the world of Miniatures in my all time favourite project to date!


Sunday, December 29, 2013

Felty Sweater Blanket Tutorial Part 3 - Piecing Together the Blanket


Remember this tutorial series I started about a Felted sweater blanket? well finally wrapping that baby up this week whilst my lovely Mama is over from Blighty and the kids are swinging off her for a change, oh sweet, sweet freedom!

Series so far
Pt 1 - Collecting your sweater stash
Pt 2 - Buying and Felting your Sweaters

Without further ado let's get cracking with the next instalment.

So you've found your sweaters, felted them and are ready to chop and sew them together into something snuggly warm and well, less like a deformed shrunken sweater.

For a blanket measuring  31 inch x 37 inches      
You will need to cut 80  4.5 inch squares
(no particular reason for this size other than it being a nice size for an armchair)

DSCF5588

Cutting

I've used a Rotary cutter and ruler, and even scissors and a paper template pinned to the sweater and then cut round it, either works fine. Just get stuck into it and remember this is going to leave you covered in fluffy fibres so expect a little mess.

Avoid cuffs, necklines and ribbing, these can be saved for something else crafty and felty.


For my blanket I cut the sweaters into 4.5 inch squares for the larger squares, and because I was left with quite a lot of smaller pieces I decided to make a matching cushion with the smaller 2 inch squares. This was a great way to use up the awkward  pieces left over and reduce my stash even further, win win!

Design

Decide how you want your blanket to look, I opted for a super simple random colour mix and just stitched the squares together in strips then played around on the floor readjusting them until they looked as random as possible. It turns out that quite a bit of work goes into making things appear haphazard, who knew?!


Sewing

Regular Polyester thread, regular sewing needle stitch length at 2.0 and tension at your regular settings, it really isn't a big deal sewing with wool on your home machine, totally do-able for any basic machine. Just ensure you backstitch at the start and finish of each piece to prevent the stitching coming out before the pieces are sewn together.

Don't sweat it if the pieces are slightly off when you cut them, Wool is your friend and you can just lightly stretch the pieces to match up,  this isn't traditional quilting or patchwork you can totally bend the rules!

To save you some time I would line up your squares into pairs with wrong sides facing then stitch each pair not breaking the thread until you've finished your pile  (the wrong side is fuzzier than the right side but neither is too noticeable should you mix them up.) Once you have your pairs, stitch sets of pairs together and then fours together until you have the length of each piece matching the size you're going for.  I put the whole blanket top together in an evening, blogging about it totally takes longer than making it I promise you it's going to come together super quick!

Last and final Tutorial coming up on Friday, let's get this blanket finished!

Final instalment here:
Pt 4 - Finishing up your Blanket


Saturday, November 23, 2013

Felted Sweater Tutorial Pt 2 - Buying and Felting your Sweaters

DSCF5367
 
So you've been itching to make a recycled sweater blanket, but where do you start? (disclaimer: expect serious puns here people!)


what you've missed -
Pt 1 - Collecting your sweater stash


Getting hold of your clothing to felt.

Free option - Ask family, friends and neighbours if they've recently had a wool washing disaster and offer to take the offending article off their hands, you could even try posting on Freecycle.org, Kijiji or Craigslist. Who hasn't shrunk something by accident.

Charitable spending - Get your thrift on, my recommendation is Salvation Army (Among the highest % of profits go straight to charitable causes in comparison to Goodwill which is minimal)

 Check out your local thrift stores sweater section (then Scarves, Skirts and Dresses too).

 
DSCF5582
 
Depending on the size of your blanket and the felted size of your garments, 4 or 5 sweaters should be adequate for a nice single sized lap blanket, obv. larger sizes require more wool garments.

Top Tips
  • Check the label for wool content, the higher the better, 75% and up, anything else is unlikely to felt.
  • It Must be Wool, that covers Angora, Cashmere, Mohair, Laine (French for Wool) any of these in a mix are fine too.
  • Be sure to check for moth holes, holding garment up to the light will show any holes.
  • To be extra safe you can throw the wool garments into a Freezer for 3 days to kill (hopefully) any moths. Leaving them out in the daylight will also deter moths.
  • Check for softness, itchy garments produce itchy felt.
DSCF5581

Have a ton of felted sweaters already for cutting? ok overachievers, take the day off and see me at the next tutorial. everyone else stay seated.

Getting felt up! - How to felt your Wool clothing

Wool + Heat + Moisture = Felty goodness

Brace yourself for a one step process... throw them in a hot wash with detergent. That's it easy huh?

Let's take a look at them, not sure if they've been felted already? snipping into the seam will let you know, if it unravels, throw it in again with a dryer ball to agitate it. Throwing the wet article in the Dryer can also speed up the process.

DSCF5583
Non Felted Cashmere
DSCF5585
Felted Wool

Have a close look at the stitching, if you can easily make out the V of the stitching (or other fancy stitches) then you may need to repeat the above process, if the surface looks fluffy and stitches are hard to depict then we're in business people.


A Woolly fact = Since Wool is a protein just like Human hair, washing it in your Shampoo can help to clean it and Conditioner will work as a Fabric softener.

DSCF5532

Next up how to Cut and piece together your Felted Sweater pieces in Pt 3.

Next instalments:

Pt 3 - Piecing together your Blanket
Pt 4 - Finishing up your Blanket


Sunday, November 17, 2013

Sweater Refashion - Part 1 Felted Sweater Cosy throw Tutorial

DSCF5367

Canadian Winter is in full effect, snow pants, mittens, scarves, the works, and whilst I'm in love with the snow, I am definitely getting my hibernation on.

Not for me the Skiing and Skating, I'm more of an Apres ski stay in the chalet quaffing Hot Chocolate flavoured melty Marshmallow juice kinda gal. What I love most about Winter is the time to seriously get my craft on, this is the project currently warming my cockles ;)

Made from 100% repurposed material, felted sweaters and Virgin wool backing, this was an easy peasy way to recycle all those 'whoops I washed this on hot' too small wool clothing you've had lying around.

In fact I've been feeling pretty guilty myself about neglecting my blog, I've been seriously slacking on the ole Tutorial front, so here is the start of a step by step multi part, easy to understand tutorial on how to make your own recycled sweater blanket/quilt. Everything from selecting your sweaters, felting, cutting, sewing, and finishing.


DSCF5368
 
What you need to know before you start

I know that sewing stretchy fabrics freaks some of you lovely peeps out, so here are a few tips and dispelled myths to put you at ease.

1. You CAN sew stretchy fabrics without a serger/overlocker. That's right, no fancy machine required. (In fact Dilly that ancient sewing machine you bought for a tenner just to make curtains? yep that'll work)

2. You CAN sew using a straight stitch, doesn't need to be a zigzag (for this project at least).

 
So what do you need to start collecting?

Sweaters must be at least 75% Wool, Angora, Cashmere, Virgin Wool all good. What won't work, Acrylic sweaters, Polyester, Cotton, anything with less than 75% Wool.

The bigger the size to begin with the better, felting the sweaters will shrink them into a cuttable, non fray fabric , the more you start with, the more usuable fabric you end up with.

Sweaters aren't the only thing to look for, Knit skirts are a great way to get lots of usable fabric as are Cardigans, even wool scarves, no seams to cut around just straight up fabric.


Stay tuned for next post on how to felt your sweaters.


Pt 2 - Buying and Felting your Sweaters
Pt 3 - Piecing together your Blanket
Pt 4 - Finishing up your Blanket


Tuesday, September 17, 2013

Sauce bottle lid to Embroidered Pincushion

\
 
I've been heard to witter on about the awesome Craftster (crafting community) around these here parts, if you aren't aware of it , you probably should be, in fact go look me up (mink_bikini) then perhaps excuse my completely ridiculous user name!
This little slice of crafty goodness I've been working on is for a Pincusion swap on Craftster . My partner was looking for a bottle cap pincusion to add to her collection, and she likes Paisley so instead of the usual teeny tiny pincushions I've made before, I upped the ante and used the lid from a squirty sauce bottle. It gave me a decent sized surface to add some swirly loveliness, sequins and well, who does not love Rick Rack!


I am definitely no expert in Embroidery, but I threw a few stitches at it from my limited skill set, Chain stitch, Blanket stitch, Lazy Daisy, French Knots somehow the Blanket stitch came out in two different versions (totally by chance!)
 
 
Not a bad transformation wouldn't you say! another otherwise discarded piece of waste turned into something useable and cute.


Hmmm swirly!


Still fits in the palm of your hand, perfect size!


This one will soon be winging its way to the USA but if you're hankering for some more Bottle cap goodness you should definitely check out HERE, you see it turns out, that Bottle caps are my thing.
Related Posts Plugin for WordPress, Blogger...
01 09 10