Firstly, the irony that I almost did not finish this 'finishing up' tutorial is not lost on me, I have been umming and ahhing about continuing with the blog after being given a sweet sewing gig that I need so much more time than I have access to. I really do love to blog so I'm toughing it out and will be trying to post once a week to get back in the swing of things. I love you guys for sticking with me when things go quiet xoxo
Moving on,
The series so far;
Pt 1 - Collecting your Sweater stash
Pt 2 - Buying and Felting your sweaters
Pt 3 - Piecing together your Blanket
Finishing your felted sweater Blanket
You arranged your patchwork strips into an arrangement you love and now need to pull this project together into something you want to throw over your chair to show off your handiwork.
Good news is that there are lots of options for finishing your blanket.
Easiest option
It's not even cheating if you just cut your lose threads and call it a day, Felted sweaters will not unravel providing they were felted enough in the first place. If when you cut the sweater pieces up they didn't run or unravel you are safe with this option.
Sure your seams will show but if you like the look of them go with it, put your feet up under your new blanket and grab a cuppa!
Intermediate Options
I backed my blanket and added batting for extra warmth, here's how.
1. With wrong sides together of your blanket and your backing fabric, stitch around all four sides leaving an opening (unstitched area) of approx 8 inches (depending on your blanket size). Back stitch either side of the opening to make sure the stitches don't pull apart during the next step.
2. Flip the blanket inside out until the right side is showing. If you choose to use batting pop it inside your blanket now, first cutting around the blanket as a template and then trimming as necessary if it doesn't lay flat inside the blanket , 1/4 to 1/2 inch should be enough.
3. Hand stitch the opening closed using a Whip stitch or any small stitches that will not easily be seen.
Note: Adding an additional layer between the batting will require some tying or quilting to secure all the layers together, this can be as simple as tying small knots or making small running stitches at regular intervals. I tied knots every corner of every square in my version.
If your fabric layers are stretching, try lowering your feed dogs or adding sticky tape to the underside of the sewing machine foot to help it move more easily over the fabric. A walking foot may also help if you have one. None of those working for you? Get handstitching, there's no shame in it!
Experienced Options
If you are no stranger to bias tape then finish this sucker off with a contrasting bias tape will really showcase your skills, bear in mind the knit fabric will have some stretch and this may require handstitching throughout.
Extra flourish
Try embroidering around the edges in Blanket stitch in a bright colour to show off your stitches, this is a nice step to take if you hand stitched the blanket together.
Coming up? I step into the world of Miniatures in my all time favourite project to date!
Remember this tutorial series I started about a Felted sweater blanket? well finally wrapping that baby up this week whilst my lovely Mama is over from Blighty and the kids are swinging off her for a change, oh sweet, sweet freedom!
Series so far
Pt 1 - Collecting your sweater stash
Pt 2 - Buying and Felting your Sweaters
Without further ado let's get cracking with the next instalment.
So you've found your sweaters, felted them and are ready to chop and sew them together into something snuggly warm and well, less like a deformed shrunken sweater.
For a blanket measuring 31 inch x 37 inches
You will need to cut 80 4.5 inch squares
(no particular reason for this size other than it being a nice size for an armchair)
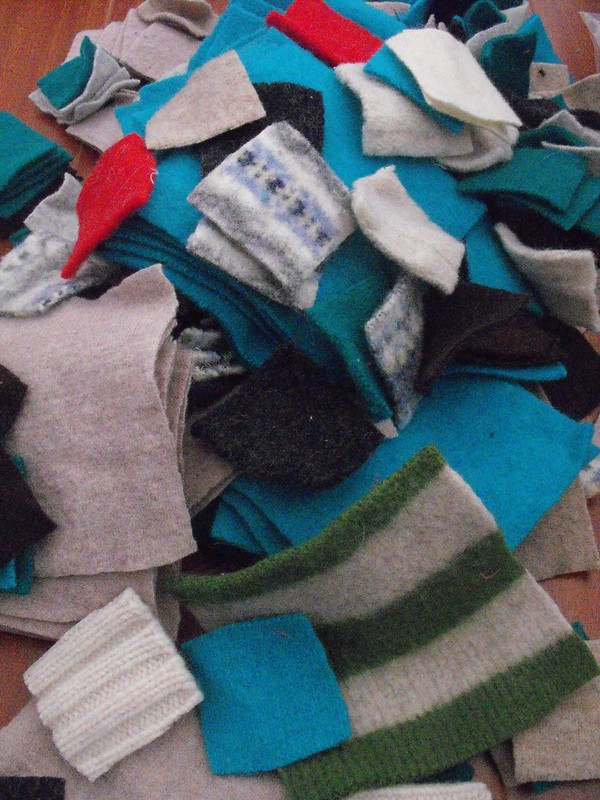 Cutting
I've used a Rotary cutter and ruler, and even scissors and a paper template pinned to the sweater and then cut round it, either works fine. Just get stuck into it and remember this is going to leave you covered in fluffy fibres so expect a little mess.
Avoid cuffs, necklines and ribbing, these can be saved for something else crafty and felty.
For my blanket I cut the sweaters into 4.5 inch squares for the larger squares, and because I was left with quite a lot of smaller pieces I decided to make a matching cushion with the smaller 2 inch squares. This was a great way to use up the awkward pieces left over and reduce my stash even further, win win!
Design
Decide how you want your blanket to look, I opted for a super simple random colour mix and just stitched the squares together in strips then played around on the floor readjusting them until they looked as random as possible. It turns out that quite a bit of work goes into making things appear haphazard, who knew?!
Cutting
I've used a Rotary cutter and ruler, and even scissors and a paper template pinned to the sweater and then cut round it, either works fine. Just get stuck into it and remember this is going to leave you covered in fluffy fibres so expect a little mess.
Avoid cuffs, necklines and ribbing, these can be saved for something else crafty and felty.
For my blanket I cut the sweaters into 4.5 inch squares for the larger squares, and because I was left with quite a lot of smaller pieces I decided to make a matching cushion with the smaller 2 inch squares. This was a great way to use up the awkward pieces left over and reduce my stash even further, win win!
Design
Decide how you want your blanket to look, I opted for a super simple random colour mix and just stitched the squares together in strips then played around on the floor readjusting them until they looked as random as possible. It turns out that quite a bit of work goes into making things appear haphazard, who knew?!
 Sewing
Regular Polyester thread, regular sewing needle stitch length at 2.0 and tension at your regular settings, it really isn't a big deal sewing with wool on your home machine, totally do-able for any basic machine. Just ensure you backstitch at the start and finish of each piece to prevent the stitching coming out before the pieces are sewn together.
Don't sweat it if the pieces are slightly off when you cut them, Wool is your friend and you can just lightly stretch the pieces to match up, this isn't traditional quilting or patchwork you can totally bend the rules!
To save you some time I would line up your squares into pairs with wrong sides facing then stitch each pair not breaking the thread until you've finished your pile (the wrong side is fuzzier than the right side but neither is too noticeable should you mix them up.) Once you have your pairs, stitch sets of pairs together and then fours together until you have the length of each piece matching the size you're going for. I put the whole blanket top together in an evening, blogging about it totally takes longer than making it I promise you it's going to come together super quick!
Last and final Tutorial coming up on Friday, let's get this blanket finished!
Final instalment here:
Pt 4 - Finishing up your Blanket
Sewing
Regular Polyester thread, regular sewing needle stitch length at 2.0 and tension at your regular settings, it really isn't a big deal sewing with wool on your home machine, totally do-able for any basic machine. Just ensure you backstitch at the start and finish of each piece to prevent the stitching coming out before the pieces are sewn together.
Don't sweat it if the pieces are slightly off when you cut them, Wool is your friend and you can just lightly stretch the pieces to match up, this isn't traditional quilting or patchwork you can totally bend the rules!
To save you some time I would line up your squares into pairs with wrong sides facing then stitch each pair not breaking the thread until you've finished your pile (the wrong side is fuzzier than the right side but neither is too noticeable should you mix them up.) Once you have your pairs, stitch sets of pairs together and then fours together until you have the length of each piece matching the size you're going for. I put the whole blanket top together in an evening, blogging about it totally takes longer than making it I promise you it's going to come together super quick!
Last and final Tutorial coming up on Friday, let's get this blanket finished!
Final instalment here:
Pt 4 - Finishing up your Blanket
So you've been itching to make a recycled sweater blanket, but where do you start? (disclaimer: expect serious puns here people!)
what you've missed -
Pt 1 - Collecting your sweater stash
Getting hold of your clothing to felt.
Free option - Ask family, friends and neighbours if they've recently had a wool washing disaster and offer to take the offending article off their hands, you could even try posting on Freecycle.org, Kijiji or Craigslist. Who hasn't shrunk something by accident.
Charitable spending - Get your thrift on, my recommendation is Salvation Army (Among the highest % of profits go straight to charitable causes in comparison to Goodwill which is minimal)
Check out your local thrift stores sweater section (then Scarves, Skirts and Dresses too).
Depending on the size of your blanket and the felted size of your garments, 4 or 5 sweaters should be adequate for a nice single sized lap blanket, obv. larger sizes require more wool garments.
Top Tips
- Check the label for wool content, the higher the better, 75% and up, anything else is unlikely to felt.
- It Must be Wool, that covers Angora, Cashmere, Mohair, Laine (French for Wool) any of these in a mix are fine too.
- Be sure to check for moth holes, holding garment up to the light will show any holes.
- To be extra safe you can throw the wool garments into a Freezer for 3 days to kill (hopefully) any moths. Leaving them out in the daylight will also deter moths.
- Check for softness, itchy garments produce itchy felt.
Have a ton of felted sweaters already for cutting? ok overachievers, take the day off and see me at the next tutorial. everyone else stay seated.
Getting felt up! - How to felt your Wool clothing
Wool + Heat + Moisture = Felty goodness
Brace yourself for a one step process... throw them in a hot wash with detergent. That's it easy huh?
Let's take a look at them, not sure if they've been felted already? snipping into the seam will let you know, if it unravels, throw it in again with a dryer ball to agitate it. Throwing the wet article in the Dryer can also speed up the process.
 Non Felted Cashmere

Felted Wool
Have a close look at the stitching, if you can easily make out the V of the stitching (or other fancy stitches) then you may need to repeat the above process, if the surface looks fluffy and stitches are hard to depict then we're in business people.
A Woolly fact = Since Wool is a protein just like Human hair, washing it in your Shampoo can help to clean it and Conditioner will work as a Fabric softener.
Next up how to Cut and piece together your Felted Sweater pieces in Pt 3.
Next instalments:
Pt 3 - Piecing together your Blanket
Pt 4 - Finishing up your Blanket
Canadian Winter is in full effect, snow pants, mittens, scarves, the works, and whilst I'm in love with the snow, I am definitely getting my hibernation on.
Not for me the Skiing and Skating, I'm more of an Apres ski stay in the chalet quaffing Hot Chocolate flavoured melty Marshmallow juice kinda gal. What I love most about Winter is the time to seriously get my craft on, this is the project currently warming my cockles ;)
Made from 100% repurposed material, felted sweaters and Virgin wool backing, this was an easy peasy way to recycle all those 'whoops I washed this on hot' too small wool clothing you've had lying around.
In fact I've been feeling pretty guilty myself about neglecting my blog, I've been seriously slacking on the ole Tutorial front, so here is the start of a step by step multi part, easy to understand tutorial on how to make your own recycled sweater blanket/quilt. Everything from selecting your sweaters, felting, cutting, sewing, and finishing.
What you need to know before you start
I know that sewing stretchy fabrics freaks some of you lovely peeps out, so here are a few tips and dispelled myths to put you at ease.
1. You CAN sew stretchy fabrics without a serger/overlocker. That's right, no fancy machine required. (In fact Dilly that ancient sewing machine you bought for a tenner just to make curtains? yep that'll work)
2. You CAN sew using a straight stitch, doesn't need to be a zigzag (for this project at least).
So what do you need to start collecting?
Sweaters must be at least 75% Wool, Angora, Cashmere, Virgin Wool all good. What won't work, Acrylic sweaters, Polyester, Cotton, anything with less than 75% Wool.
The bigger the size to begin with the better, felting the sweaters will shrink them into a cuttable, non fray fabric , the more you start with, the more usuable fabric you end up with.
Sweaters aren't the only thing to look for, Knit skirts are a great way to get lots of usable fabric as are Cardigans, even wool scarves, no seams to cut around just straight up fabric.
Stay tuned for next post on how to felt your sweaters.
Pt 2 - Buying and Felting your Sweaters
Pt 3 - Piecing together your Blanket
Pt 4 - Finishing up your Blanket
01
09
10


