courtesy of yegangyoo.co
)/GetFile.aspx?File=Sleeves%2foffsetcircle.jpg)
Ok sounds complicated right? the sleeve falls from the shoulder into a cascade of folds, surely that must have been painstakingly draped? Nope, the 'Angel' sleeve is just your common or garden circle. To prove it check out below for my super Ghetto mini tutorial involving a Jersey pillowcase, a plate, a a pair of scissors and my bingo wings ;)
Using a round object e.g a plate draw a circle. Cut through both layers, voila 2 sleeve patterns cut. This plate is 11 inches across, if you want a bigger sleeve measure the distance from your shoulder to the point at which you want the sleeve to end e.g the crook of your elbow and double it, draw and cut a circle to this measurement (measurement = totall distance across the circle).
Next you want to ascertain the grain of the knit, this determines where the folds are going to be on your sleeve. Check out the direction of the knit stitches (the look like v's and you want them running top to bottom) fold circle in half.
Fold circle in half again and cut a line between the two folds right into the middle of the circle making sure only to catch one layer of fabric. This should give you a 45 degree cut into your fabric, i.e cutting the fabric on the bias.
Open it out to ensure you only cut through one layer.
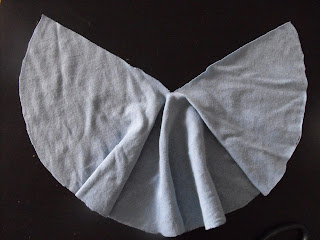
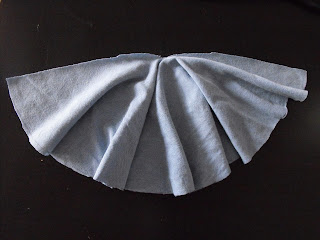
Open out the circle and here come the folds.
Fully opened out, see instant shape with little work.
The cut you make into the circle makes the shoulder edges i.e the part of the sleeve that should be sewn on to your t-shirt shoulder seam, the rest of the circle is your glorious sleeve.
Since I 'm not actually refashioning garments to incorporate each of these sleeves (I have no idea even what size I am these days beyond 30 weeks massively pregnant!) I am going to show you using jersey, t-shirt fabric, it's a great place to start with refashions since you don't have to worry about raw edges unravelling, they're more likely to curl if anything.
My serger needle is proving impossible to replace so until I can get stitching here is a very unsightly picture of me sans maquillage balancing a sleeve on my shoulder. If you unlike me actually wish to wear your sleeve without it falling off I'd stitch it on to your garment. The centre of the circle is the point you need to match up with your shoulder seam, the other cut edges stitch to the front and back armholes of your top/dress making sure to sew the sleeve with right side facing the right side of your garment.
If you're not using Jersey or wish to have a more finished edge there are several ways to do this;
1. Folding under the raw edge and stitching, bear in mind you will lose length of your sleeve this way.
2. Adding bias tape, nothing gets turned under so your sleeve coverage ends up the same. Using a contrast bias tape is going to make your sleeve pop, this is my fave way.
3. Quick and dirty, serge and leave as is.
4. Stitch a zigzag stitch and slightly stretch the fabric as you go, this will give you a wavy lettuce leafy edge to your sleeve.
Sleeve shapes and your shape
So who is going to look great in this sleeve? depends on the length. The teeny tiny one I made by drawing round a plate just for a super quick tutorial would be great on anyone with really toned arms, notice it really shows off my pregnancy Bingo wings to great effect. If you have arms heavier than twigs I would opt for a larger circle, the distance from the centre to the outside (radius) should be equal to the measurement from your shoulder seam (where front and back of the garment meet) to the crook of your elbow.
Great fabrics for disguising heavier arms? Anything gauzy and light, a chiffon or very light cotton, the stiffer the fabric the more architectural and stiff these 'folds' are going to be, anything too stiff and you may need to enter doors sideways ;)
Want to go really long? I'd keep it to the elbow length unless you are a, re-enacting a Nativity scene b, in an Abba tribute band or c, off to a renaissance faire :)
So there we go, first sleeve done, more to come and where I can I will be offering a refashion to show you the sleeve in full 'wearable' style.


9 comments :
Please note the first picture is a variation on the Angel sleeve, this one has two circles of varying sizes, the first larger circle stitched into the shoulder seam, the 2nd smaller circle appears to be stitched only at the top of the shoulder edge with the unsecured raw edges turned under.
Now that is very inspiring, thank you!
Very cool sleeve! (I think you are Size Beautiful right now.)
Ooo I like your version of the Angel Sleeve very, very much! You look amazing too BTW, wish I looked that good preggers..
Awww thank you my lovelies, I could have done with some of your lovely comments during my shopping trip for maternity clothes this weekend. ;)
Ooof! That needle in the butt sounded rather a painful shock!
Hope your needlekeeper (from Adventures in Thread) turns out well.=)
Nice tute, thanks for sharing. I've been searching for mods to up the ante on basic jersey tops, this looks like a good one for summer.. PS please install disqus so I don't have to play the recaptcha game of impending blindness for every comment I post..
theperfectnose, great idea just having trouble adding Disqus to blogger, code not appearing on add page element for some odd reason. Going to try again, if we can avoid recaptcha that would be AWESOME, it's soooo annoying I agree ;)
Have disabled word verification at least, hope this helps with the dreaded recaptcha til I can add Disqus to my blog, thanks for the great idea too, any blog tips are soooo welcome ;)
Post a Comment